Thursday 28 November 2013

Your 1st Christmas - Nov 1st Stuck?! Sketch

Hello!

Today I am sharing my layout that I created using the November 1st Stuck?! sketch. I had a lot of fun joining in with one of their sketch challenges last month... I used the sketch to create a double page layout!! If you'd like to take a look at my entry for last month, you can see it here. I thought I would give this a go again, using a single page sketch to create a double layout (which is the format that I most like to scrap in). Sooo, here is the awesome sketch that I used...


And here is my layout...


What better time of year than now to catch up on those Christmas layouts that I always put off doing!! This was Isaac's first Christmas. He was only 4 months old... and now he is 6!! I do have a few of these Christmas layouts to catch up on!!

I didn't stick to the sketch religiously, but rather I used it as a starting point. The first thing I did was turn the sketch on its side so that the banner and photos ran horizontal across the page. I also added an extra photo as I had more room to play with being a double layout.

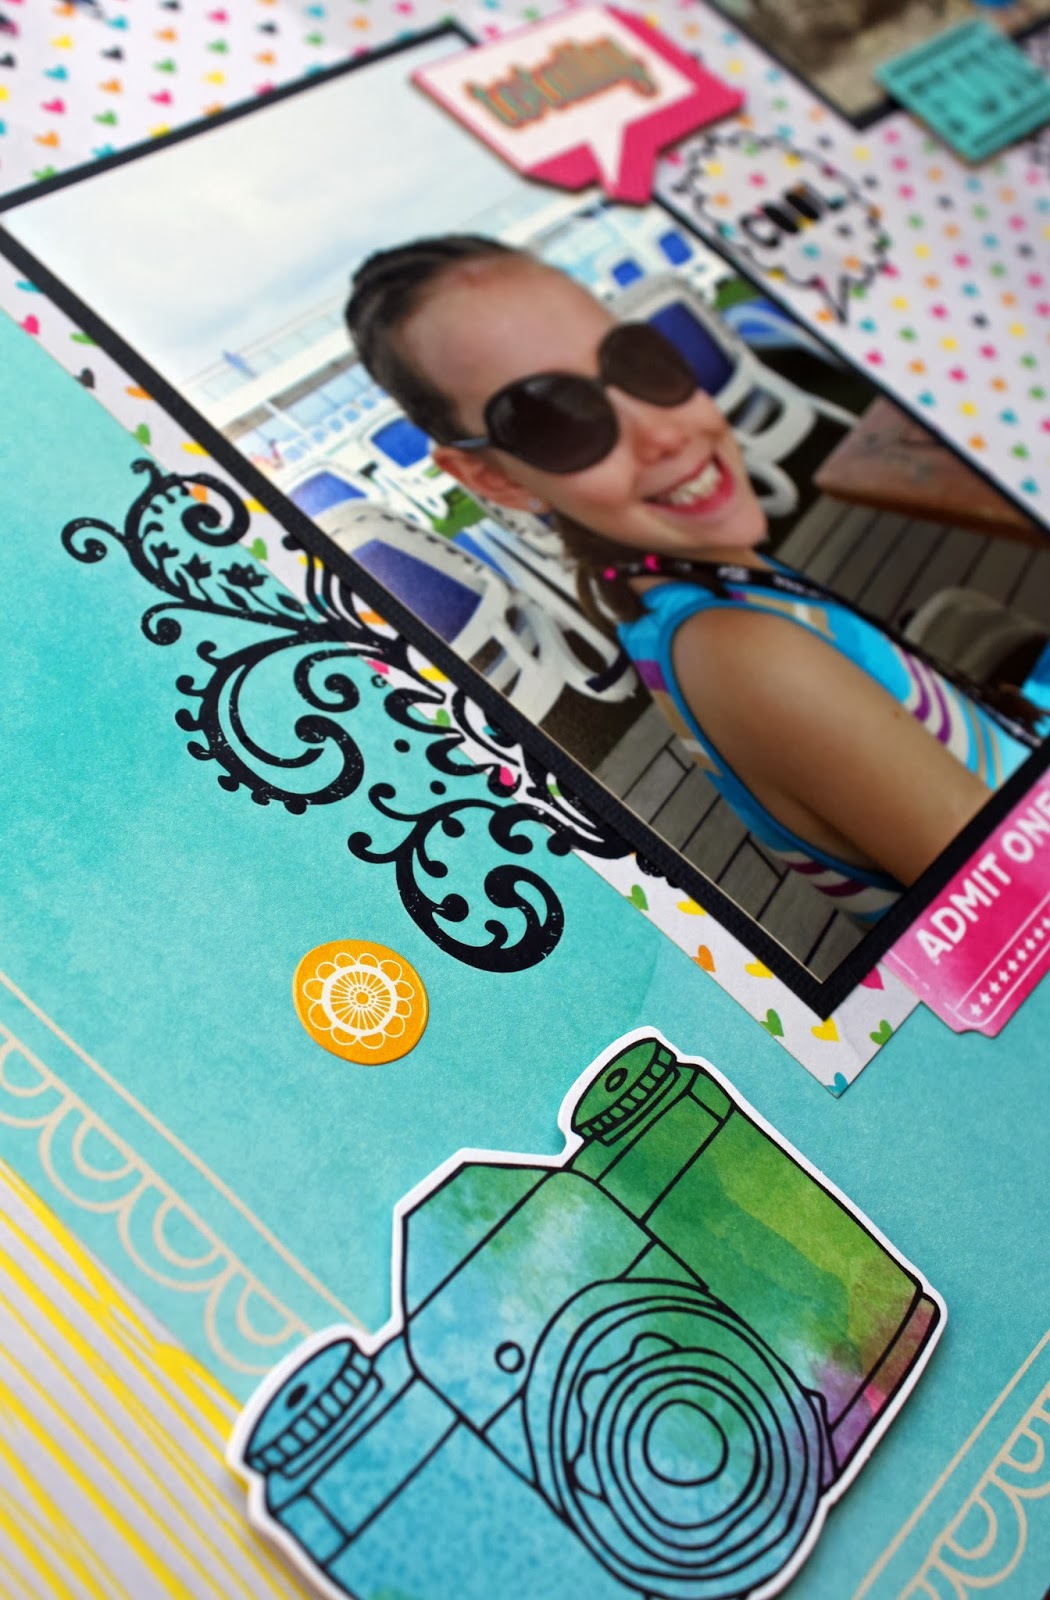
Here are some closeups to show you some more detail...


For my title I used AC Thickers as well as Kaisercraft letters and Mini Alphas. I added a banner above the title to create a sense of fun... This was made using a die-namics die with co-ordinating patterned papers. You can also see some of my background work in this photo... I used distress ink with two different templates - the chevron one is Kaisercraft and the polka dots one is Prima. I like the effect of the two layered on top of one another to give the background some depth.


What's a Christmas layout without some sparkle?!! I added a couple of glittery MAMBI chippies along with some sequins and rhinestones to give my layout the sparkle that it needed! I fussy-cut those doilies from the Kaisercraft patterned paper and layered them behind the photo to replace the stars in the sketch.


I also fussy-cut that little Christmas Tree from the patterned paper and added some rhinestones to finish it off before mounting it with foam tape.


Some more sequins, glittery chipboard, and another fussy-cut doily. I also added this Amy Tangerine die-cut 'Spread the Love', which I thought was appropriate.

There's only a couple more days left if you want to join in with this challenge at Stuck?!

Thanks so much for visiting my blog and taking a look at my layout. Thanks for your lovely comments as well - I love to read them!!

Until next time... Happy Scrapping!

Mandy

Friday 22 November 2013

New Shades - 123 Challenge November

Hi there!

I hope this finds you well :-)

I'm loving that its Friday afternoon - the weekend is here!!

This month I'm joining in with the challenge at 123 Challenge Blog. I've been wanting to play along with them for the past couple of months, and now I've finally been able to! They have such a talented design team over there who provide such gorgeous inspiration!! Here is the challenge for the month of November:

* COLOUR = TEAL
* WORD = COOL
* TECHNIQUE = STAMPING

Isn't it a great challenge!! As soon as I saw it I knew which photos I wanted to scrap and I pretty much had in my head what I wanted to do. However, when I sat down to create, the layout seemed to have a mind of its own and it took a different direction!! I love how different products can inspire us in different ways... It was that way for me with these Amy Tangerine papers. My original plan went out the window because I loved these patterned papers so much that I just wanted them to be the feature. And so this is how my layout turned out...


I am really happy with the end result - I love how the gorgeous bright colours look with a few splashes of black to ground them.

How "cool" does my lovely girl look in her sunnies!!

Here are some close-ups to show you some more detail:


That gorgeous chipboard butterfly is one that I've had for awhile and is from MAMBI. I mounted it with foam tape to give it some more dimension.


For my title I used Bella! chipboard alphas and American Crafts letter stickers. I chose black lettering as I wanted the title to really stand out and not get lost against the patterned paper.


With the pictures of sunglasses on this WRMK sticker, I just had to use it on my layout - it was the perfect addition to a layout dedicated to my daughter's "new shades".


As per the requirements, here is my use of the word 'cool'. I love that both of these stickers are speech bubbles... I put them together to make it look like Abigail was saying "totally cool"... a phrase that she would "totally" use!


I also used the word 'cool' in my journalling.


By the time I got around to doing my stamping I wasn't sure how I was going to incorporate it with so many busy patterned papers. I knew that any stamping on the background would just get lost. So instead I used this "fun" stamp by Hero Arts and BasicGrey to create my own word embellishment. I stamped it onto a scrap of the teal paper that I had used for my background, then cut it out and mounted it with foam tape to create a perfectly co-ordinated embellishment!


I also used some of the Amy Tangerine die-cuts and stickers from the same range as the patterned papers. I totally love that camera die-cut!!

I hope that you enjoyed looking... I appreciate you taking the time to visit and thank you to the lovely people who leave me a comment!!

Happy Scrapping!!

Mandy

Saturday 16 November 2013

My Girl - MME November Gratitude Challenge

Hi again!!

I'm back today to share a layout that I created for the My Minds Eye November Gratitude Challenge. The challenge is to document your gratitude and of course your layout must consist mainly of MME products.

I recently purchased the 'My Girl' collection of papers and stickers from MME, and they were perfect to document the gratitude that I have for my beautiful daughter Abigail. This is the layout that I created:


How gorgeous are the colours in this collection?!? I love the combination of aqua, pink and yellow together :-)

MME products that I have used on this layout include the patterned paper and stickers (all from the My Girl collection), as well as the chipboard sticker and the enamel dots.

Here are some closeups of my layout...


The pink and yellow flowers are both from the My Girl Sticker Sheet. The blue flower I made from felt using the Tim Holtz Tattered Florals die and I finished it off with a MME enamel dot in the middle.


'The good life' chipboard banner is from the Collectable range from MME.
The 'my girl' label I fussy-cut from one of the sheets of patterned paper and I have used it as my title.


I made these blue chevrons using my Stampin' Up border punch and I mounted them with foam dots to give them some dimension.
I used my Epiphany Craft tool to make the epoxy circles on my layout. I love that it is so easy to create co-ordinating embellishments with this tool.


Some more stickers from the 'My Girl' collection... I love the hot air balloon!!


And here is a closeup of my title / journalling. This is what I am grateful for... that I get to have this amazing girl as my daughter. I feel so thankful to God every day that He has blessed me with her!!

I really enjoyed making this layout and reflecting on what I am thankful for. Of course I am equally grateful for my awesome husband and son, but this time my layout is focused on my daughter.

Because I was limited to using mostly MME products on this layout, it came together fairly quickly... I just pulled out the MME products that I had on hand to see what would work, and then added just a few other bits and pieces to finish it off.

I hope you have enjoyed looking. Thank you so much for visiting!!

Mandy

Thursday 14 November 2013

Christmas Cards

Hello!!

Well it's been a couple of weeks since my last post, and I have been a busy little scrapper, BUT I can't share my layouts just yet because..... the last two layouts that I completed were both accepted for publication in Scrapbooking Memories magazine!!! Yay... isn't it so exciting to receive an email from a magazine saying that they would like to consider your work for publication?!? So you can imagine my excitement when I received two of these emails in the last two weeks!

Soooo... As I can't yet share my recent layouts that I've been working on, I thought I might share some of my Christmas Cards that I started working on last weekend. I had a card-making day with my Mum & sister on the weekend, and while there was lots of chatting, we did get down to business with our Christmas Cards :-)

Here are the first 5 that I created...


I kept them all fairly simple in design as I was going for quantity :-) Don't you just love the bright reds and greens of Christmas papers? I will let you know that most of the Christmas patterned papers that I used are Kaisercraft, but they aren't current ranges, they were in my stash from past years.

I used different techniques on each of them, so I will show you some closeups:


Not sure if you can see from the picture, but for this one I used a chevron embossing folder on the red cardstock (I'm just loving anything with chevrons at the moment!!). Then I just cut out some Christmas pictures from patterned paper and wrapped some pretty ribbon around and I was done!


Hexagons are another of my faves at the moment. The funny thing is, I've had this Creative Memories hexagon punch for probably about 8 years and I've hardy used it, but lately it's been getting a good work out! It's funny how things like this make a comeback :-) I also used my Die-Namics alphabet die to make the word 'joy'.


More chevrons :-) This one is a newly acquired border punch from Stampin' Up - I love it and I can see myself using it all the time!! I also used a Stampin' Up stamp and framelits die on this one, both of which belong to my Mum - that's the good thing about scrapping/card-making with friends... you can share each others tools!


This one might be my favourite, cos I love the polka dots! I used a mask and Distress Ink to create the polka dots... I was really pleased with how vibrant they look on the white card. I chose this patterned paper, because I think the round Christmas baubles tie in well with the dots. The 'celebrate' stamp is a Little Yellow Bicycle one.


 And last but not least! I used another embossing folder on the red cardstock for this one - I love the texture that dry embossing gives to an ordinary piece of cardstock :-) I fussy-cut the doily/flower from patterned paper, and the sentiment was cut from a Darkroom Door strip.

How are you going with your Christmas cards this year? We got into the Christmas cheer and had carols playing while we made our cards - it was so much fun!

I hope you enjoyed looking! I really appreciate the time that you take to come and visit my blog and especially when you leave comments. So thank you!!

Mandy